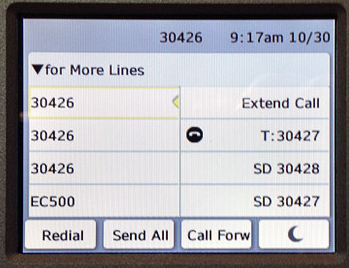
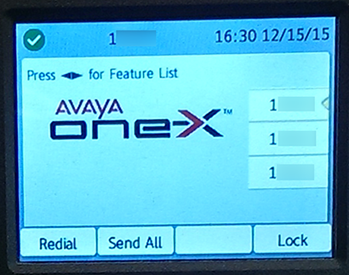
Setting Up a Voicemail Email Account in Outlook 2016

Check your voicemail via your email on Outlook 2016 for Mac Windows

Resetting Passwords

Voicemail passwords expire yearly. When resetting this password, turn off ALL devices (including mobile phones) that connect to your Unified Messaging voicemail account. After you change your voicemail password, start each device one at a time (disconnected from the internet if possible), open your email client, and input the new voicemail password.

Failure to do so may result in being locked out of your voicemail. If this happens, call 540-231-6780 to unlock your account.

  1. Set up voicemail on your phone and ensure that you set your voicemail password so that it's different from the default password used to set up voicemail the first time.
  2. Start Outlook 2016.
  3. From the ribbon, select the File tab.
  4. Click the Add Account button.
  5. Click the Manual setup or additional server types radio button and cick Next.
  6. Click the POP or IMAP radio button and click Next.
  7. Manually configure your voicemail email account:
    1. In the Your Name text box, type your name.
    2. In the Email Address text box, type your 5-digit phone extension followed by @voicemail.uc.vt.edu. An example email address would be 12345@voicemail.uc.vt.edu.
    3. From the Account Type drop-down list, select IMAP.
    4. In the Incoming mail server text box, type: voicemail.uc.vt.edu
    5. In the Outgoing mail server (SMTP) text box, type: smtp.vt.edu
    6. In the User Name text box, type your five-digit extension.
    7. In the Password text box, type the password you created when you set up your voicemail.
  8. Click the More Settings button.
  9. Select the Advanced tab.
  10. Under Incoming server (IMAP), from the User the following type of encrypted connection drop-down list, select SSL.
  11. Verify that the Incoming server (IMAP) port is 993.
  12. Click OK.
  13. Click Next.
  14. Outlook will test your settings. When this completes, click the Close button.
  15. Click the Finish button.
  16. From the Office ribbon, select the Send/Receive tab.
  17. Click the Send/Receive Groups button.
  18. From the drop-down list, select Define Send/Receive Groups.
  19. Select All Accounts and click the Edit button.
  20. From the left pane, select the account for your five-digit extension.
  21. Click the Account Properties button.
  22. Select the IMAP E-mail tab.
  23. In the Outgoing Mail Server (SMTP) text box, clear "smtp.vt.edu" and replace it with "x".
  24. Click OK.
  25. Click OK.
  26. Click the Close button.

Having problems? Submit an incident at 4help.vt.edu

Tell us what you think, take our training website survey